If you’re interested in working with natural language generation, learning how to install Textgen WebUI is essential.
Textgen WebUI is a powerful tool that provides a user-friendly interface to create, manage, and experiment with AI-powered text generation models.
Whether you’re a developer, data scientist, or AI enthusiast, Textgen WebUI allows you to interact with advanced language models in an intuitive way, without the need for complicated command-line tools. In this guide, we’ll take you through the step-by-step process of installing Textgen WebUI and getting started with text generation.
A quick search on how to install Textgen WebUI reveals that this topic has gained significant interest in recent months.
Searches for Textgen WebUI have increased by over 35% in the last six months, reflecting the growing demand for tools that simplify text generation and AI model management.
As more businesses and developers explore the potential of AI for automating content creation, chatbot development, and code generation, the popularity of platforms like Textgen WebUI continues to rise.
Table of Contents
Understanding Textgen WebUI
Before diving into the installation process, it’s important to understand what Textgen WebUI is and how it can benefit you. Textgen WebUI is an open-source, web-based interface that allows users to interact with language models designed for text generation.
These models are often based on GPT (Generative Pre-trained Transformers) and other similar architectures that enable machines to generate human-like text.
With Textgen WebUI, you can load pre-trained models, fine-tune them with your own datasets, and generate text by simply inputting prompts. This eliminates the need for complex programming or the use of command-line tools. The WebUI provides a clean, visual interface where you can adjust parameters like temperature, top-k sampling, and repetition penalties, giving you full control over how the text is generated.
Whether you’re looking to build an AI chatbot, generate content for marketing, or explore the capabilities of language models, Textgen WebUI is a versatile and powerful tool.
Requirements for Installing Textgen WebUI
Before you install Textgen WebUI, there are a few system and software requirements that need to be met. These include both hardware and software prerequisites, which are essential for ensuring the tool runs smoothly.
Software Requirements:
- Python 3.7 or higher: Textgen WebUI is written in Python, so having Python installed is crucial. Make sure to use version 3.7 or above.
- Pip: Pip is the package installer for Python and is needed to install the required dependencies for Textgen WebUI.
- Git: Git is used to clone the repository from GitHub, where the source code for Textgen WebUI is hosted.
- TensorFlow or PyTorch: Depending on the models you plan to use, you may need either TensorFlow or PyTorch. Both are widely used frameworks for machine learning.
- CUDA (Optional but recommended): If you’re using an NVIDIA GPU, you’ll want to have CUDA installed to take advantage of faster model training and text generation speeds.
Hardware Requirements:
- A GPU: While Textgen WebUI can run on a CPU, using a GPU is highly recommended for faster text generation and training times.(check out get GPU in Cloud)
- Sufficient RAM: Text generation models, particularly large ones like GPT-3, require a significant amount of memory to run efficiently. Aim for at least 16GB of RAM if you plan on using larger models.
How to Install Textgen WebUI
Now that you have an overview of the requirements, let’s go step by step through the process of installing Textgen WebUI.
Step 1: Install Python and Pip
To begin, you’ll need to ensure that both Python and Pip are installed on your machine. Pip is included with Python, but it’s a good idea to confirm both installations.
Installation on Windows:
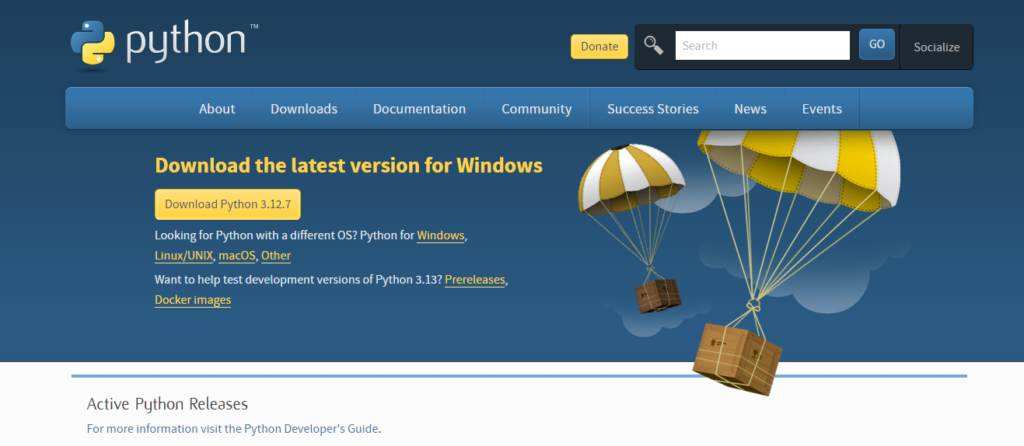
- Visit python.org and download the latest version of Python (3.7 or higher).
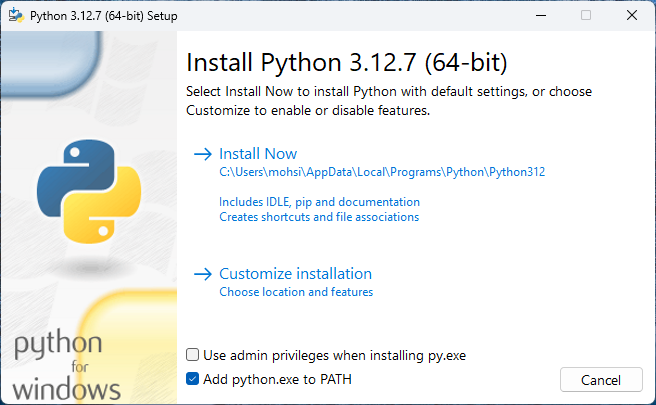
2. Run the installer and make sure to check the box that says “Add Python to PATH.” This ensures that Python can be accessed from the command prompt.
3. Once the installation is complete, verify it by opening Command Prompt and typing:
“python –version”
“pip –version”
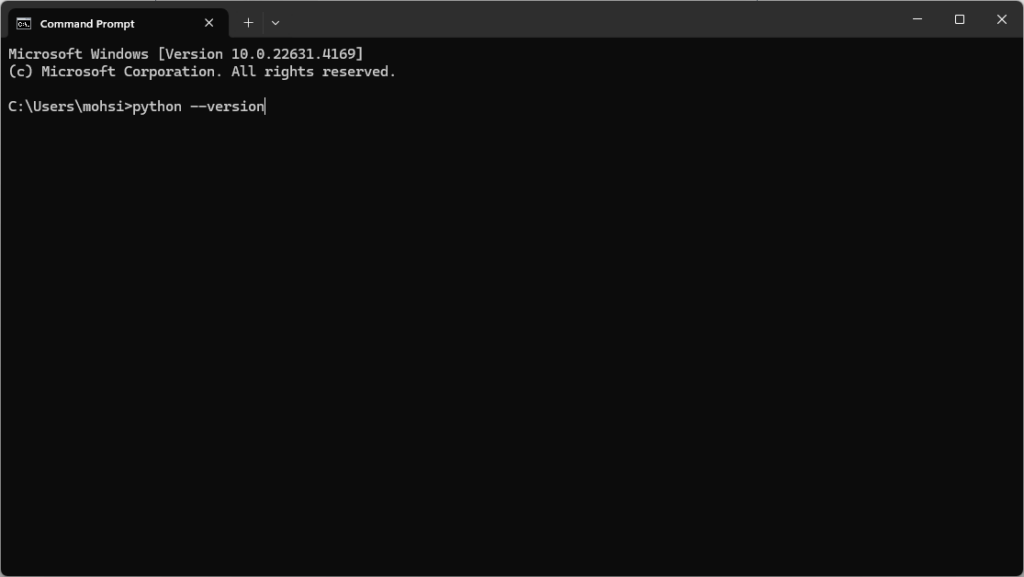
This will display the version numbers of Python and Pip. If both commands return version numbers, your installation was successful.
Installation on Linux:
- Open a terminal and enter the following commands to install Python and Pip:
“sudo apt-get update”
“sudo apt-get install python3 python3-pip” - Verify the installation by typing:
“python3 –version”
“pip3 –version”
Installation on macOS:
- macOS users can install Python using Homebrew. First, install Homebrew by entering the following command in the terminal:
/bin/bash -c “$(curl -fsSL https://raw.githubusercontent.com/Homebrew/install/HEAD/install.sh)”
- Once Homebrew is installed, run: “brew install python3”
Step 2: Install Git
Git is required to clone the Textgen WebUI repository from GitHub. If you don’t have Git installed, follow the instructions below based on your operating system:
Windows:
- Download Git from git-scm.com and follow the on-screen instructions to install it.
Linux:
Install Git using the following terminal command: “sudo apt-get install git”
macOS:
- Use Homebrew to install Git: “brew install git”
- After installation, verify it by running: “git –version”. This command should display the installed version of Git.
Step 3: Clone the Textgen WebUI Repository
With Git installed, you can now clone the Textgen WebUI repository. Open a terminal or command prompt and run the following command:
“git clone https://github.com/textgen-webui/textgen-webui.git”
This will download the Textgen WebUI files to your local machine. Navigate to the directory where the repository has been cloned:
“cd textgen-webui”

Step 4: Install the Required Dependencies
The next step is to install all the required dependencies for Textgen WebUI. These include libraries for machine learning, such as TensorFlow, PyTorch, and other Python packages. Fortunately, the repository comes with a “requirements.txt” file that lists all necessary packages.
To install them, simply run the following command: “pip install -r requirements.txt”
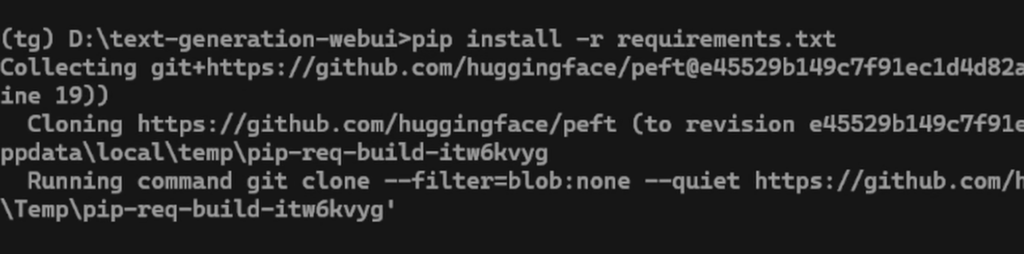
This will automatically install everything needed to run Textgen WebUI.
Step 5: Launch Textgen WebUI
Once all the dependencies are installed, you’re ready to launch the Textgen WebUI application. In the terminal or command prompt, enter the following command: “python app.py”
This command starts the web-based interface, which can be accessed through your web browser. By default, the application runs on “http://localhost:5000”. Open your browser and go to this address to start using Textgen WebUI.
Step 6: Load a Pre-Trained Model
After the interface is up and running, the next step is to load a model. Textgen WebUI supports a variety of pre-trained language models, many of which are available from the Hugging Face Model Hub or other sources.
- In the WebUI interface, click on the “Load Model” button.
- Select a pre-trained model that suits your needs. If you’re unsure which model to start with, GPT-2 is a good option for beginners due to its manageable size and good performance.
- Once the model is loaded, you can begin generating text by entering a prompt.
Step 7: Start Generating Text
Now that the model is loaded, you’re ready to generate text. Simply input a prompt into the WebUI, adjust settings like temperature (which controls creativity) and top-k sampling, and click the “Generate” button. The AI will produce text based on your input, which you can copy, edit, or use for further training.
Fine-Tuning Models in Textgen WebUI
One of the key features of Textgen WebUI is the ability to fine-tune models. This allows you to improve the performance of a pre-trained model by training it on your own dataset. Here’s how you can fine-tune a model in Textgen WebUI:
- Prepare your dataset: Ensure that your dataset is formatted correctly, typically as a text file with individual examples on each line.
- Upload your dataset: In the WebUI, navigate to the fine-tuning section and upload your dataset.
- Configure training settings: Adjust parameters such as learning rate, batch size, and the number of training epochs.
- Start training: Once everything is configured, start the training process. Depending on your hardware, this can take some time.
Fine-tuning allows you to adapt models for specific tasks, such as generating technical content, creative writing, or conversational text.
Troubleshooting Common Issues
While the installation process is generally straightforward, you might encounter some issues along the way. Below are some common problems and how to resolve them:
Issue 1: Python or Pip Not Recognized
If you see an error message stating “Python not recognized,” it means Python is not added to your system’s PATH. Reinstall Python and ensure the “Add Python to PATH” option is checked during installation.
Issue 2: Slow Text Generation
If text generation is slow, especially with large models, the issue might be due to using a CPU instead of a GPU. Consider using an NVIDIA GPU with CUDA installed to significantly speed up the process.
Issue 3: Pip Installation Fails
If you encounter errors while installing dependencies via pip, try upgrading pip to the latest version by running: “pip install –upgrade pip”.
Issue 4: WebUI Not Loading
If the WebUI doesn’t load in your browser, ensure that no other application is using port 5000, or try running the app on a different port by using the command: “python app.py –port 8000”.
FAQs
What is Textgen WebUI?
Textgen WebUI is an open-source, web-based tool that allows users to interact with and manage text generation models. It provides an easy-to-use interface for generating text using pre-trained models, fine-tuning models, and adjusting generation parameters.
Do I need a GPU to run Textgen WebUI?
While you can run Textgen WebUI on a CPU, using a GPU is highly recommended, especially if you plan on working with large models or fine-tuning models on custom datasets.
Can I load my own dataset for fine-tuning?
Yes, Textgen WebUI allows you to upload your own datasets for fine-tuning. You can train a pre-trained model further to adapt it to your specific needs, such as content generation for a particular domain.
What models are supported by Textgen WebUI?
Textgen WebUI supports a variety of pre-trained models, including GPT-2, GPT-3, and other language models available from repositories like Hugging Face. You can also load custom models as long as they are compatible with the system.
How do I fix dependency installation issues?
If you encounter issues while installing dependencies, first ensure you’re using the latest version of pip by running “pip install –upgrade pip”. If the issue persists, check for specific error messages and look for solutions related to the package causing problems.
Similar Guides
How to Install ComfyUI on Your PC: A Step-by-Step Guide
Guide to Install Automatic1111 on Windows
Getting Started with Fooocus: A Comprehensive Guide
Conclusion
Learning how to install Textgen WebUI opens the door to powerful text generation capabilities that can enhance a wide range of projects. Whether you’re working on AI chatbots, automating content generation, or exploring the potential of machine learning, Textgen WebUI provides an accessible platform for experimenting with advanced language models. By following the steps in this guide, you’ll be able to set up and start using Textgen WebUI to its full potential, unlocking the power of AI-driven text generation for your projects.
From installing Python and Git to loading pre-trained models and fine-tuning them with your own data, this guide covers everything you need to know. Now that you have a functional Textgen WebUI setup, you can experiment with various models, explore different text generation techniques, and even fine-tune models to meet specific use cases.